
Sea of Stars Guide – Glacial Peak
Mission List (Tap to jump down the page!) |
||
Climbing The Peak |
||
Two & Four |
||
The Block Puzzle |
After jumping in the portal from Resh’an’s study, we’ll be in a brand new snowy area. The path up here is pretty linear, beginning with climbing a rock wall, grappling over a gap past some icicles and toward a save point. Make sure you use this!
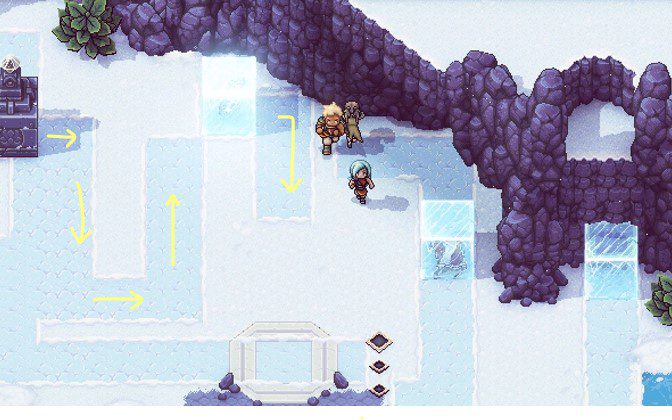
Head through the doorway to the left and keep moving up this linear path. The next area features some new rolling enemies called Rochecrossidere and a broken bridge. Jump over the bridge after defeating those enemies and you’ll notice an icy track on the ground. Move all the way to the left and push the ice block from behind down and to the right, so it’s the other side of this track.

Before using the Celestial relic, follow the ice block along and climb up to open a chest, holding Music Sheet #5.
Return to the Celestial relic, stand on the diamond and change the time to day. In doing so, it will melt the ice and allow you safe passage up the rock wall.

Climbing The Peak
Climb up the wall, tightrope over the two gaps and at the next platform, climb up the rock wall again and take a left. There’s a campfire here we can rest at. There also some berries on various trees all the way up the route, but we won’t tediously list every single one!
Once you’ve done all that, progress to the right. There’s a couple more rolling enemies and a new one that’s arguably the worst we’ve faced up to this point, aptly called Boulder Douche.
This icy disk jockey has a standard attack that’s not too bad but its charged icicle attack is brutal. It’ll do a lot of damage, so be sure to try and break those locks as quickly as you can! These guys are vulnerable to Moon damage, so Moonerang is a great idea, while Serai’s Disorient will help delay the Icicle attacks too.
Once that’s done, move into the next area and you’ll notice lots of icy blocks and strange black rocks sticking out the ground. For now, ignore all of this and progress up from the right. In order to do so, move the ice block by the blue lake down and across the marked track so we can travel up.

Climb on top of the cube and onto the next platform, where we’ll be greeted by two more Boulder Douche enemies. Once they’re dead, keep climbing up the rock wall. More enemies await us here, with another Boulder Douche and three Rochecrossidere. This fight in particular may be troublesome for some people, especially given how quickly the minions can hit and the brutal Icicle move from Douche.
It’s a good idea to use Garl’s Hurl ability on the Rochecrossidere so they’re all grouped together, and follow it up with a Sunball/Crescent Arc combination to try and end this fight as quickly as possible.
Once they’re dead, keep moving up the path, via the path to the left.

The route from here is honestly super linear so it’s unlikely you’ll get stuck. When you reach the topmost area, where trees separate the frozen waterfall from the snowy area, we want to take a leap of faith down.

In doing so, you’ll find yourself under the ice from the previous area. Take out the enemies that show, rest up and save the game. Cook what you need and move north of the save point, just to the right to enter a new location. Grapple over and we’ll be faced with another boss fight.
Two & Four
Boss Fight – Two & Four |
||
|
Now it’s time to face the other half of the Acolyte group. You’ll now be faced with the prospect of a much tougher fight – but only if you target the wrong Acolyte! Here, we want to focus our attention on Two, who some pretty nasty attacks in his arsenal. Two will use Spread Attack, which hits every party member with a ball of energy. As for Four, he’ll continue to hit you with physical attacks, pummelling you down. However, Two’s charged attack comes in the form of Todome, where he’ll grab Four and a chunk of rock, and throw it straight at one of your party. It does pretty big damage, has a short wind-up time, and it’ll be quite hard to block as well. You can try to use Serai’s Disorient but your best bet here is going to be Valere’s Lunar Shield and healing items to try and mitigate the damage. In terms of tactics, Garl’s Hurl can be useful to group the pair of Acolytes together to get bonus hits in, while Valere’s abilities and Zale’s Sunball are also good to use. Two also has another trick up its sleeve though. It has another charge attack. This one is Group Heal, similar to the Woodland Spirit’s move earlier in the game. This will do a good chunk of HP recovery, hence why it’s preferable that you target Two first. If you don’t, you’ll likely see this move and prolong the fight. Keep hitting your big moves and swap out your party to freshen up the MP and move-set. Eventually they’ll go down. |
||
| Rewards: | ||
| 3774 Experience Points | ||

With the Acolytes defeated, they’ll retreat and allow you to continue up the path. Ther’s another very linear track here, so I won’t write all of that out. More importantly, at the end of this pathway you’ll find yourself at the very peak of, well, Glacial Peak.
Zale and Valere will interact with the icy rune and gain a brand new item, Solstice Amulet. This is a game-changing item that allows you to change the time of day on the fly. It’s a neat addition, although unlike something akin to Octopath Traveler, it’s not going to alter enemy strength or anything like merchant stock etc. Instead, this will be used for puzzle-solving!
Remember that earlier Celestial Puzzle with the melting ice? Well, we’re basically going to do the same here. Sunbeams from the crystal will melt ice, while moonlight will melt the black rocks with blue cracks down them.

The next area serves as a tutorial of sorts for this mechanic, so be sure to get comfortable moving the time from day to night and back again. Progress back through to the previous save point.
From here, we want to melt the ice blocking the movable crystal cube by spinning the sunbeam around to the thick ice to the left. When that’s done, push the crystal along the icy track until it falls off the edge to the platform below.

Now we want to change the time to night and push the crystal block all the way to the left.

Inside happens to be a chest holding 1x Signet of Clarity. This basically reduces down the cost of abilities by 1 MP. It’s up to you who you choose to give this to, but it’s highly advisable to equip this to either Zale or Valere!
The Block Puzzle
Once you reach the ground level again, we’ll be back at this big block puzzle. There’s one central crystal tower and a whole bunch of cubes dotted around. First up, shift the time onto the diamonds leading to the sun and moon symbols on the ground so both light u. Given the short window of time for sun, start with moon first. With both lit up, this will remove the barriers around the crystal block and allow you to push it freely.

Spin the time around to night and destroy the black rock to the right (pictured above). Push the ice block behind it down and switch the time to day. Shine the light on it to reveal a chest holding 1x Sapphire Ore.
Next, push the crystal cube to the left and up, changing the time back to night and destroying the two rocks blocking the path. While you’re here, push the cube through the newly created pathway on the left. Switch the time to day and melt the ice.

Next, push the ice block just to the right here up and to the left slightly. We then want to push the cube crystal all the way along the right track to the top.
This will reveal a Scroll which happens to hold the Combo skill, Item Roulette. When you’re done with all this, head down the ladder to the left, which we can now access after melting the ice.
Unroll the ladder at the end of this linear path, descend down and we’ll be back at our starting point of the Peak. Interact with the pink orb by the doorway and return to the Archives.
<< Tower of Antsudlo |
Torment Peak >> |
You can check out our full walkthrough and game guide here! |
|