
Alan Wake 2 Guide: Old Gods
Approaching The Nursing Home
Exit the Break Room where we saved originally and clear up a few more collectibles before we continue to the Valhalla Nursing Home. Open up your map if you get stuck but take the path north east first. Here’s the map:

ONE
This is literally just to the right of the Break Room when you exit. You’ll know you’re on the right track when you have large rock chasms on either side. Eventually this path will curl round to the right and up a slope.

Head forward to begin with and check around the large boulders to find another Cult Supply Box. There’s another rhythm puzzle to solve so do this and open the box. Grab the goodies from inside and continue on, forward past the box (in the direction shown in the screenshot below).

Next to a running stream, you’ll find another Nursery Rhyme. Place the Mother Doll on the Gouse, and the Child Doll on the Tree. Collect up the dolls after and follow the dark markings on the path all the way back down to the Break Room. En-route, you’ll find 1x Charm in the middle of the pathway.
TWO
Now, continue on the path south (to the right of where you picked up the Charm and down the slope). Leave the track when it starts sloping and look out for an abandoned truck. On the back of the pick-up is another Cult Supply Box (pictured below).

There is a math equation on the note if you fancy solving it, but otherwise the code to get in is 177. Now, turn left from the pick-up truck and almost adjacent to this location is a campsite (pictured below).
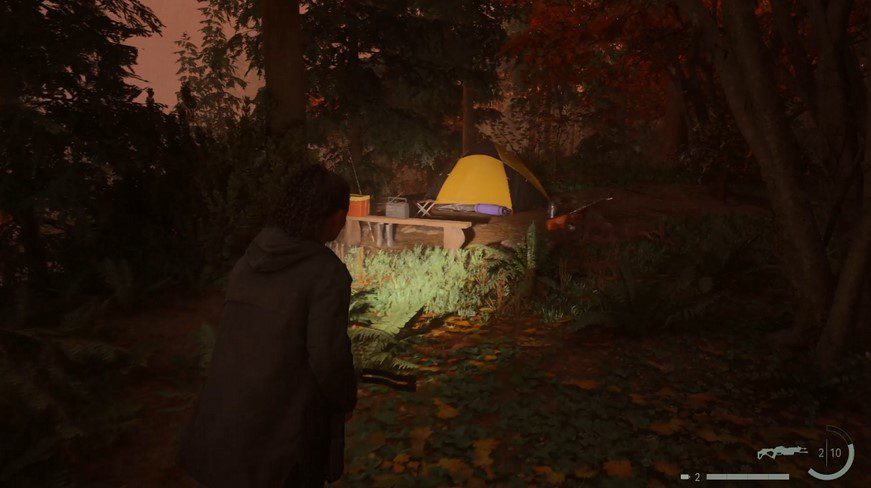
While not essential, approaching will net you 1x Jim’s Mayoral Candidacy videotape.
THREE
Continue on the path west from where you found the Cult Supply Box on the back of the truck. Up on a hill, grab another Casey Lunchbox, holding 7x Manuscript Fragments inside.
FOUR
Go as far south as you can on the main path and you’ll notice the familiar sigil for the lunchbox location on the wooden pole. Head up the path to the left and you’ll find another Casey Lunchbox, holding 8x Manuscript Fragments inside.

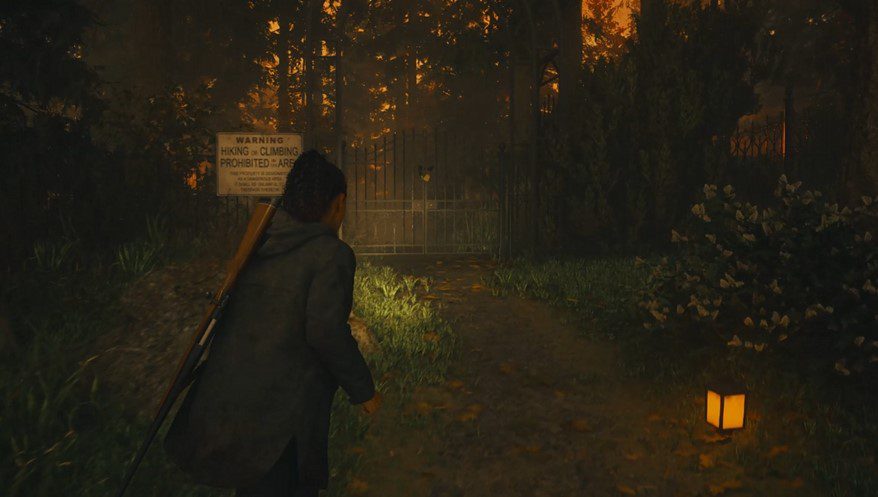
Valhalla Nursing Home
Now, return to the Break Room and continue on the main path toward the Nursing Home. When you reach the front door, ring the bell and you’ll be greeted by Rose. She’ll be a bit sketchy when you first meet her but eventually you’ll be let inside.
Feel free to loot the different rooms down on the ground floor, which hold a good deal of bullets, Trauma Packs and more.
When you first enter, head straight into the room on the right.

Behind the desk, pick up 1x Map of Valhalla Nursing Home. There’s also a Casey Lunchbox on the counter, holding 5x Manuscript Fragments.
Return to the main hallway and poke your head in the room to the left. In doing so, you’ll gain 1x Bright Falls Blend videotape.
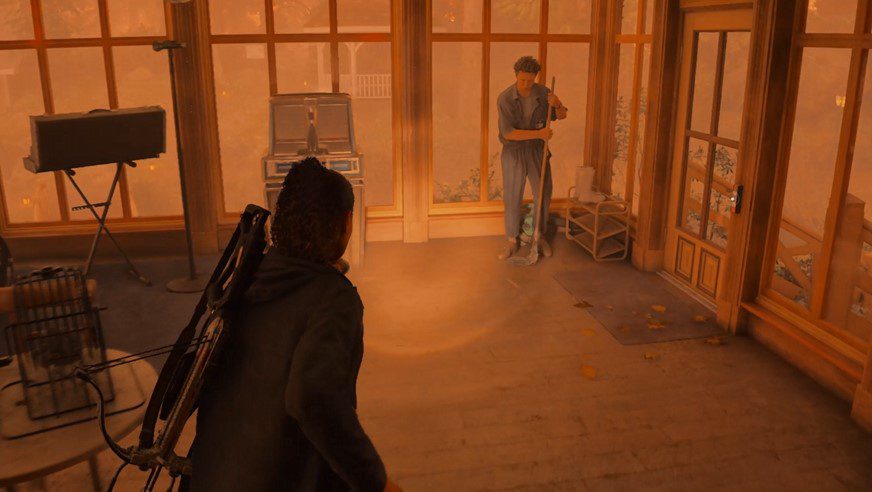
Rose will encourage you to join her in the living room where some residents are lurking about, but if you want, feel free to head up the stairs and explore to the left of the staircase on the first floor.

There’s a whole bunch of rooms up here you can loot for various gear, but make note of the room with the pool table inside, this is a Break Room (pictured above).
Exit and from the main stairwell, explore to the right. Enter Tor’s room and you’ll find the place has been trashed. Examine the dresser to the right of the table, and also the smashed glass on the floor.

You’ll find Odin in the far bedroom. The door will be closed so open it up. He will appear to be in some sort of comatose state. Check his file by the foot of the bed and speak to Odin. After a couple of half-sentences, head into the Mind Place and Profile Odin. Exhaust all the dialogue options as they show up and return to Rose downstairs.
Given we’ll be heading to the third floor later in the story, don’t worry about exploring there just yet.

Return to the ground floor and speak to the residents over in the room Rose was berating for not wearing clothes. Exhaust the dialogue for asking about Tor, and make sure you speak to the lady knitting too.
Then, head for the backdoor. It’s locked, of course, but you’ll also find a familiar janitor there. Much like the other residents, exhaust all the dialogue options with him too.
You can return to the second floor if you wish and approach the woman looking out the window at the end of the corridor, who will suddenly and inexplicably blink out of view. Creepy!
Go and speak to Rose down by the front door and go through all the dialogue options with her. Next, head into the Mind Place and place all the clues so far up on the Board.
Return to Rose and ask her about the Wellness Center. Rose will reluctantly open up the “staff area” behind her and allow you passage across the Wellness Center.
Wellness Center
When you enter the first set of doors, head over to the noticeboard on the left and grab 1x Map of Wellness Center. Continue along the linear path into the hospital.
Take a left into the Resident Area and loot the place. On the desk in front of you, be sure to pick up 1x Manuscript Page.

Approach the last bed on the left of this ward and examine the blood rags. Press X when prompted and collect 2x Pictures for examination. Before adding this to the Case, leave via the door opposite the bed and head down the hallway to Rehabilitation. Once inside, you’ll find Tor on the other side having a whale of a time.
Do note as well that at the end of this hallway (before entering Rehab), there’s a Dispensary on the right which serves as a Break Room. It’s a good idea to save here.

Enter the Rehab room and take the door to the left (pictured above). You’ll gain 1x Picture by doing so, alluding to the security we need to enter the next part of the Wellness Center. Now, the door to your left after entering will have a set of double-doors to the “exit”, which links back up to the earlier corridor.
For now, head straight ahead into the office. be sure to open the Cooler on the table before opening the next door, leading down a dark corridor.

Head all the way down the end. There’s a bathroom here on the left you can open but there’s nothing of note to see so keep pushing on. When the corridor curls to the left, you’ll notice a doorway with a knob missing (on the right) and another door straight ahead. Go into the latter.
Inside, make note of the calendar up on the wall and the dates circled (pictured below).
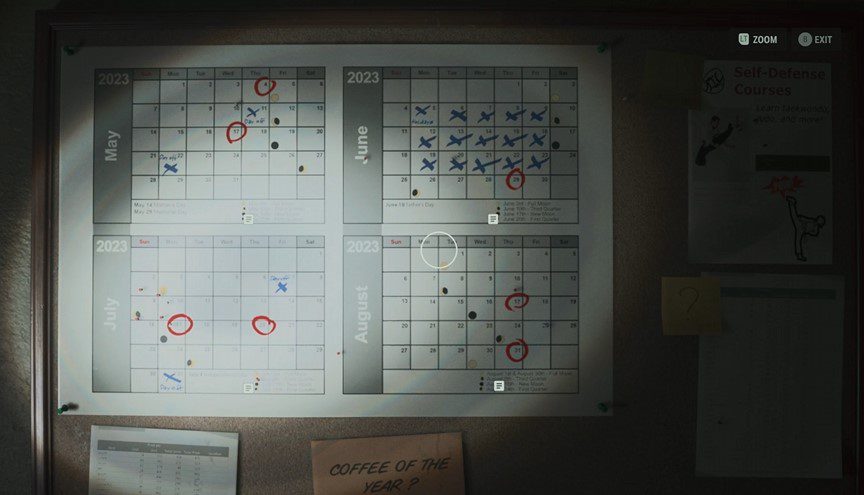
Next, circle around to the cabinets on the left and examine the book. Collect 1x Clue and then do the same for the filing cabinet, opening it up and examining all three clues for 3x Pictures.
Next, approach the computer and with all the clues together, we can solve the security clearance. The clues are with the calendar and the dates but to save you some time, it’s 170823. Once you’re in, unlock the door and be sure to press R1 to check the mail and the security camera.
At this point, head out the back door of the security room. Turn right so you’re back at the reception and through the first set of doors in front of you. Now, we can enter the Staff area. Inside, you’ll find 1x Door Knob in a cardboard box on the ground. Return to the security room, return back to the hallway and add 1x Door Knob to the door.

Inside this bonus area you’ll find 1x Manuscript Page and 1x Hunting Rifle. This is a very useful weapon so do be sure to pick it up!
Rehab
With the power back on, return to Rehab and open the door. Explore around the kitchen to the right, and make note of the hammer sticking out the wall.
Head through the kitchen to the other side and up the next corridor. Turn left to enter a little supply closet full of blue lockers. Loot the lockers and then head outside to trigger a cutscene.
Rescue Tor From The Overlap
When you gain control of Saga again, go and speak to Rose. After, Profile her in the Mind Palace. Speak to her again after this and Rose will hand over 1x Rose’s Keyfob.
Go back in the house and halfway up the stairs, on the landing, grab 1x Manuscript Page. This will open up a new Profiling action for Odin.

Head over to the locked room on the First Floor, with the plaque for Old Gods of Asgard outside. Use Rose’s Keyfob to open. Inside, collect the record from the ground. Only… it’s empty.
New Profile options will open up so exhaust that for both Odin and Cynthia before heading up to the Second Floor. This time, go all the way to the far right of the corridor and open up Cynthia’s Room using Rose’s Keyfob. Just before you do, spin round and open Gail’s Room with the same fob. On the floor of the room, you’ll find 1x Manuscript Page.
When you try to enter Cynthia’s Room, the power will go out. Wonderful.
Restore Power In The Basement
Head out the backdoor once more and turn left, circle all the way round the house until you find the basement entrance.

Go into the basement and follow the linear pathway all, all the way through the flooded basement until you come to a furnace. On the ground, collect 1x Manuscript Page. In the next adjacent room is a Break Room, and also the place we need to add another Fuse.
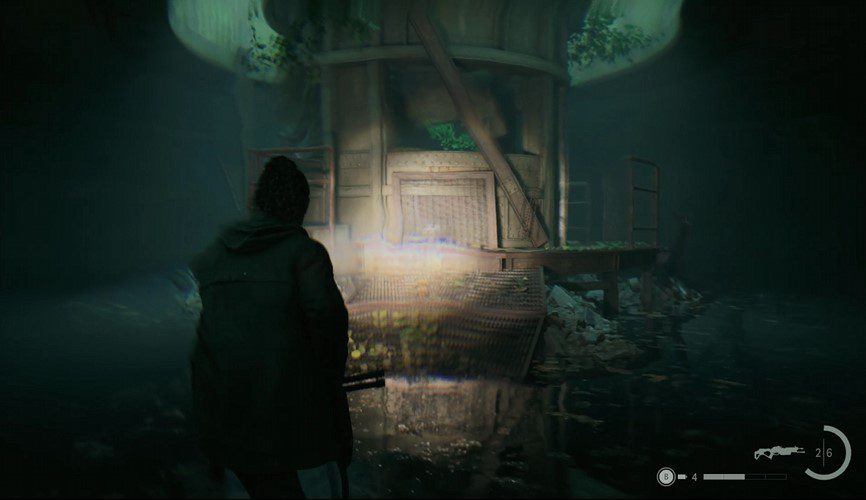
For now, exit the room and keep following the pathway along, ducking under the low beam and taking a hard left. Here, you’ll find 1x Manuscript Page on a red faded box and an open metal grate leading to our destination (pictured below).

Pass through the tunnel to the other side. You’ll find the Fuse here inside a red lockbox with a padlock on. You can find the clue up on a noticeboard just ahead. But to save you some time, it’s 273.
Grab 1x Fuse and return to the Break Room from before. Just before you do, be sure to check out the table just to the left of the Fuse in the next room. Grab 1x Manuscript Page here.
Just before exiting, maken ote of the projector that wont play while the power is out. This is a little easter egg and not essential but if you return here after turning the power back on, you’ll see more of the snuff film featuring Casey.

Return to the Fusebox, add the Fuse and turn the power back on. On the way back to the exit and out the basement, be sure to open the supply cupboard ahead (pictured below) and grab the goodies inside, including Trauma Pads and bullets.

With the power back on, head all the way back inside the house and up to Cynthia’s room. Use Rose’s Keyfob to open and check out the table by the bed.
Add the clues and do the same with the dresser on the opposite side of the room. Finally, check out the table just to the right of this dresser (on the other side of the bed) to get another clue, a gift from Tor to Cynthia.
Finally, head into the bathroom and pick up 1x Manuscript Page. Go into your Mind Place and make sure you’ve completed all the Profiling on Odin and Cynthia, as well as adding the clues up on the board.
After, hold R1 on the orb in the bath and grab 1x Anger’s Remorse record. With this collected, head down to the jukebox and add the vinyl. Be sure to take out the new variation of the Taken inside the room when you do. It has a lot of health so be sure to use your flashlight to pinpoint that weak spot.

When it’s killed, add the record to the Jukebox and enter the Pond. Just before you do, you’ll gain three new records – Take Control, The Poet and The Muse, and Anger’s Remorse.
The Overlap
Loop 1
And now we’re in a new looping section, eventually heading for a boss fight. Before we get there though, we need to navigate the labyrinth first.
Don’t enter the door marked 1, as it’ll loop you round the same path constantly. Instead, continue all the way down this long hallway until you descend into a new chamber. Destroy the Taken next to a Generator and use this to turn the power back on.

Next, head outside the door we just entered and activate the lever to the right of the door. Continue on and through the highlighted door ahead.
Loop 2
Go all the way along to the end, just like before, but this time go up the stairs. Pull the lever by the side of the cabinet to turn the power on. Head through the newly opened door into the next room. Turn this lever on and loot the room. In the desk in the far corner, you’ll find 1x Tool Cabinet Key.
Go back to the first lever, and push it back down. Use the Tool Cabinet key on the cabinet to open it up. Here, we’ll receive another key item, 1x Boltcutters.
It’s worth noting here that this will allow us to access previously inaccessible areas throughout the game, so naturally we’ll mop all of this up when the chapter ends.
With the Boltcutters in hand, flip the lever back up and return to the second room. Flip the lever back down, approach the door in the corner and take out the Taken that will ambush you.

Kill the enemy, and be sure to loot the area it came from before using the Boltcutters on the door and descending down the ladder.
Loop 3
The final loop will see things a little more trippy than before. The linear path opens up to a big chamber that’s surrounded by water
Approach the chamber and inside, attempt to press the button to turn the power back on. It won’t work. Instead, we need to activate it and get things moving again. In order to do that, we need to avoid Cynthia in the water and use the raised platforms to avoid her icy grip.

Head round the room and to the outer chamber. Once there, move through the water, being sure to jump up onto each platform to avoid being hit. Keep moving round anticlockwise and you’ll eventually come to a generator. Turn it back on keep moving anticlockwise. Then, from the stone platform, turn back and head up the raised platform (pictured below).

Return to the central control room, turn on the power and then we’ll have a boss fight on our hands.
Cynthia
Boss Fight – Cynthia |
||
|
Descend down the ladder and prepare to face Cynthia. She’ll rise up in the air and spew out projectile orbs in your direction. However, if you have your Hunting Rifle in your possession (and you should), you can get some damaging headshots in here before she does. Keep moving around the flooded chamber, switching from the Hunting Rifle to the pistol in order to maintain momentum while firing. It’s tempting to use the same tactic as before and head for the small platforms above the water, but Cynthia won’t use the same moves here… for reasons? Instead, she’ll fire off shockwaves in your direction, as well as these projectile orbs. You need to keep moving round in big circles, and avoid Cynthia getting too close. Don’t use the Crossbow here as the reload (even with the upgrades) is pretty poor and will catch you out with these shockwaves in no time. Cynthia will sometimes stop and levitate in the air without attacking for a few seconds, so use this time to switch over to the Hunting Rifle again and hit some headshots. After a good number of shots, Cynthia will drop down and begin lashing out at you, rushing at your location and swiping with both hands. Keep a distance and fire off a good number of pistol shots. Be sure to use your flashlight to slow her down and keep firing. Eventually she’ll be slain. |

With Cynthia gone, a lengthy cutscene will eventually see you back with Tor above The Overlap. At this point, head into your Mind Place and Profile Tor.
Exhaust all the options and head back to the car. Before you do though, now is a good time to collect any missing collectibles across all 3 maps. Just like before, if you don’t fancy doing this and want to continue the story, you can skip down the page.
We’ll be mopping up all Cult Supply Boxes, Nursery Rhymes, Dolls and Casey Lunchboxes, starting directly out the Nursin Home and eventually finishing in Cauldron Lake.
These are all the main collectibles in the game, and at the end of this, it’ll be a case of breezing through the story.
Skip Collectibles
Bunker Woods Collectibles
Immediately head to the back of the Nursing Home and use the Boltcutters to open the gate.
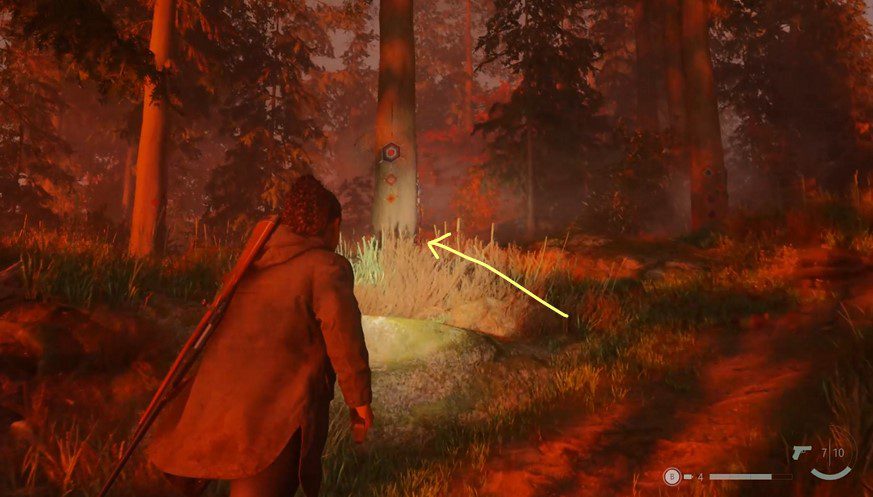
Continue on the path to the left when you reach a fork in the road, and you’ll eventually come to familiar Cult symbols. The Cult Supply Box is on the other side of the boulder (pictured below).


The key for this can be found further south. Follow the grey arrow signs and get the key from beneath the tree (pictured above). With this collected, head to the right of where you collected the Cult Supply key until you find a campsite. There’s 1x Manuscript Page by the edge of the fence. There’s also a Cooler here too.
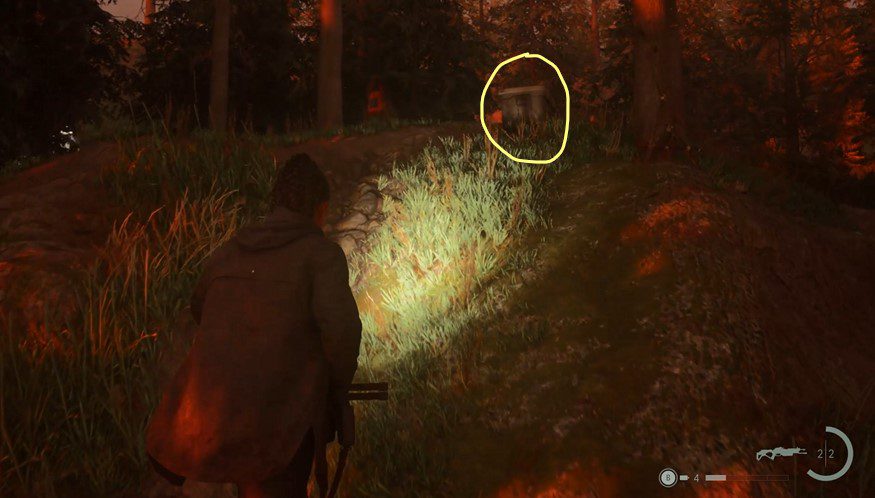
Finally, there’s a Lunchbox to grab. A good idea here is to continue on the main path until you arrive at a wooden staircase leading to the next area. Then, turn around go back up the main path you just walked until you find the sign for the Nursing Home. Just to the right of this, you’ll notice the familiar lunchbox signs on the tree. The Casey Lunchbox here can be found behind the tree.
Open it up and grab 9x Manuscript Fragments. Now, move along the path until you descend to the bottom of the staircase.
Take an immediate left and you’ll notice some familiar glowing yellow arrows in the distance.

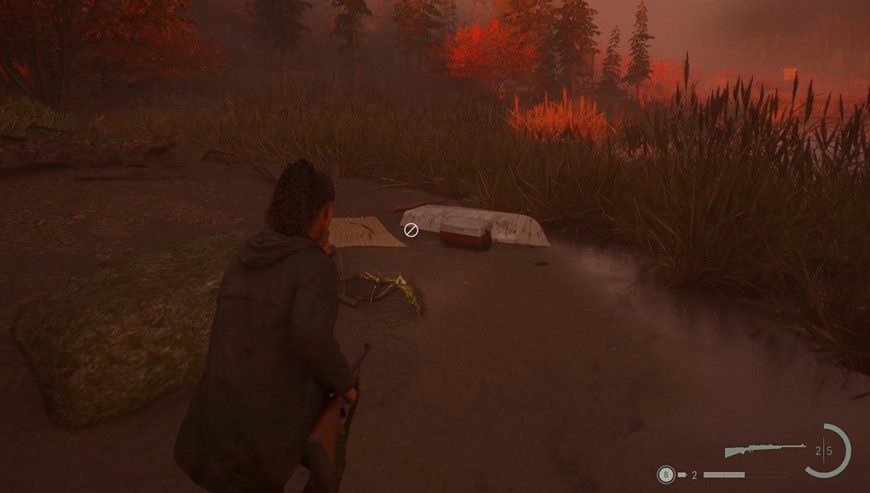
There’s a Cult Supply Box up here along with three symbols that need to be input into the lock. These can be found on the rocks next to the glowing arrows. However, we’ve pictured the solution below. Grab the goodies inside and continue down the path.

Ranger Station Collectibles
Soon, you’ll reach the Ranger Station. Approach the door and use the Screwdriver to enter. In one of the rooms on the ground floor is another Nursery Rhyme. Place the Child Doll on the House and the Monster Doll on the Sweet. Collect the dolls and head to the back door. Open it up and then follow the footprints back upstairs to the bedroom where you’ll find the charm.
Next, head round the outside of the house until you find the brick chimney. On the ground you’ll find 1x Ranger Station Stash Key.
With the key, head down the wooden stairs we just climbed up to enter the house and go across to the adjacent hill. There may be some Taken lurking about here. However, the Cult Supply box will be in full display. Use the key and grab the gear.
From this box, go north east on the map until you return to the forest path. It should fork with one path going up and another down. It doesn’t matter which one you take but when this path leads into four different
From the Ranger Station, take the path on the left which slopes down and back up again. You should come out at a four-path junction, spin the camera back whence you came and you’ll notice another sign for a lunchbox.

Grab this and pick up 8x Manuscript Fragments.
Next, keep moving along the main path east until you come to a big beach. There may be some Taken here so take those guys out before interacting with the Nursery Rhyme on the sand. Add the Monster Doll to the Wave, the Child Doll to the Jewelry and the Mother Doll to the Boat.
More Taken will show up so collect up the dolls and grab 1x charm from the other side of the beach, near an overturned boat and a Cooler
Keep moving east and we’ll now be in the boatyard.
Boatyard Collectibles
When you first arrive, you’ll notice the Casey Lunchbox sign. Follow the wooden fences around so they are to your left, and you’ll find this up on a hill in the distance, next to 1x Manuscript Page. Inside the Lunch Box is 9x Manuscript Fragments.

Head properly into the Boatyard and head for the dock heading down toward the yacht. There’s another Nursery Rhyme here. Add the Mother Doll on the Wave and the Monster Doll on the boat. Collect up the Dolls and look across to the Boatyard, the Charm will be inside here, guarded by several enemies.
With all of this done, head back toward the dock, but this time approach the wooden fence on the side. Use the Boltcutters to open it up and we’ve got a shortcut back to Bright Falls.

Bright Falls Collectibles
When you open the door, immediately head forward and behind the white van, you’ll find another Cult Supply box. Complete the rhythm on the padlock and grab the goodies inside.
Continue down the familiar strip of road until you come to the big deer on display ready for Deerfest. Just before that on the right, you’ll find a gate that can be opened now (pictured below).
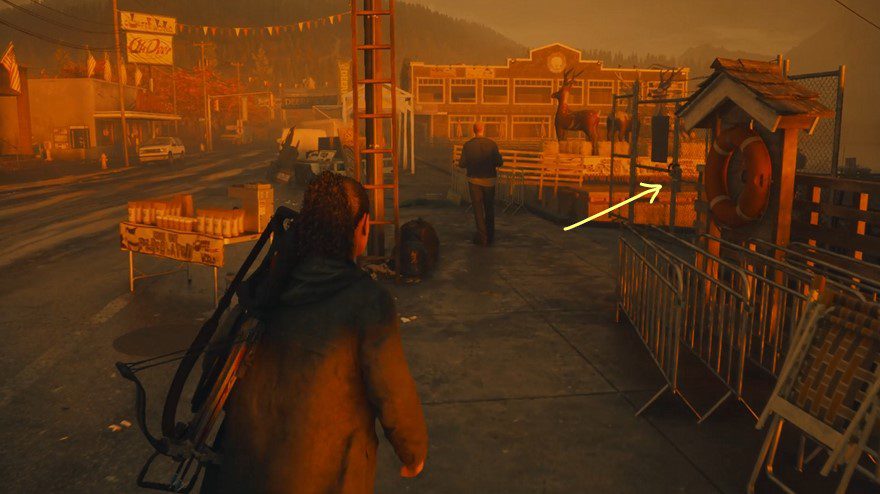
Use the Boltcutters to pry open the lock and immediately turn right to open the shed. There’s another Cult Supply Box here, and the code to open it is 697. Inside is a Pouch to increase your Inventory size, which is super useful.
With this gained, head toward Oh Deer Diner and this time, head down the alleyway to the left (where we first got the map). All the way on the left you’ll find another gate we can open with the Boltcutters.

Open it up and there will be another Cult Supply box. The symbols can be found in this general area, using the clues on the box. If you need it, the solution is here:

This is everything gained in the Bright Falls area. However, we still have some mopping up to do, so head for Watery for the next set of collectibles.
Watery Collectibles
When you arrive at Watery, head round the back of Suomi Hall and you’ll find a door here you can open with the Screwdriver. There’s a computer and some other goodies in here to loot, but more importantly, a Nursery Rhyme to your left in the far room.
Place the Maiden Doll on the House and the Trickster Doll on the Jewelry. Pick up both dolls and you’ll find 1x Charm in the mailbox just outside the house.
Now, trek all the way back through Coffee World until you find the Kalevala Knights Workshop. There’s a gate to the left of this which can be opened with the Boltcutters.
All the way at the far end of this big section, next to the garage door and the lamp, you’ll find another Cult Supply box. The code to open it is 542. Gab the goodies inside and take out the enemies that show up.

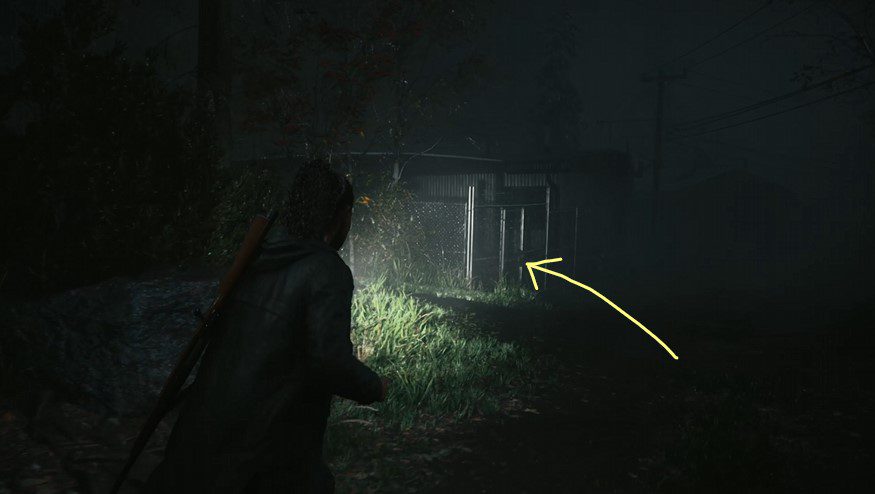
Leave Coffee World and instead, head south into the Lighthouse Trailer Park. You’ll find another gate that can be unlocked with the Boltcutters on the left side of the compound. Head down the main path and you can’t miss it.
Once inside, head to the house on the left and you’ll find another Nursery Rhyme in the far bedroom. To solve it, place the Deer Doll on the Heart and the Wise Elder on the Eye. Kill the Taken that shows up in the trailer and grab 1x Charm from the table.
Cauldron Lake Collectibles
Net, head for Cauldron Lake. There’s a specific area we need to visit, which links back to one of the very first collectibles. We’re heading for the Rental Cabins, which is marked on the Cauldron Lake’s map with a padlock.
Drive there, head through the hole in the fence and take a right. At the gate, we can now unlock this with the Boltcutters and head through. When you do, head into the Cabin marked with a number 3 straight ahead.

Loot the place and then head out the back door and take a right. Curl around and head in the back door of Cabin number 2.
There’s a Casey Lunchbox in here behind the door holding 9x Manuscript Fragments. With this collected, head out the back door again and go all the way to the left, under the fallen log. The second door on the left will be accessible, so head through and back outside again.

Now, curl round and go into Cabin number 4 on the left of the cabin we just exited. Inside will be another Nursery Rhyme. Place the Monster on the Hatchling, the Crow on the Eye and the Hero Doll on the Hatchling. This will trigger Cabin number 6 (across from this one) to unlock. Be careful as there are Taken inside. Kill these guys and you’ll find 1x Charm by the TV.
Now, at this point you will have unlocked all the Nursery Rhymes (if you’re following this guide). Add them all to the Case Board and a crate will appear next to the Charm. Our final one was by the Trailer Park in Watery and that’s where it spawned for us but it could be different, depending on which one is the last one for you.
Either way, open the case and you’ll find the final doll, 1x Father Doll inside. If you’re having trouble picking it up, leave the area, open Saga’s Mind Place and add in all the pictures for the Nursery Rhyme riddles before returning. If you still can’t pick it up, interact with some other items and return.

Just before we head for the final Nursery Rhyme location, head all the way to the right and watch for the abandoned car. There’s a hidden key in the trees, marked with a 2 on the bark (exact location pictured above).
Head here and grab 1x Lake Cabins Stash Key. Now, return all the way to the entrance of the Rental Cabins and enter the cabin to the right. (Number 1). In the bathroom is a Cult Supply box we can open with the Lake Cabins Stash Key.

Finally, head all the way over to the other side of the map to the Witchfinder’s Station. There’s a new audio puzzle to solve over a radio instead of written down. There are drawings over the house on both floors.
In order to solve this, in the downstairs area place the Father Doll on the Eye, Hero Doll on the Sun and the Mother Doll on the Heart.
Now, go upstairs and place the Trickster Doll on the Wave and the Child Doll on the Hatchling. Speak on the radio again and then pick up the charm box on the table, which will give you 1x Extra Charm Slot.
Back To Bright Falls
With all the collectibles gained, head back to the police station in Bright Falls. As soon as you enter the station, the next chapter will trigger.
<< Initiation 4: We Sing |
Return 6: Scratch >> |
You can check out our full walkthrough and game guide here! |
|