
Assassin’s Creed Mirage Guide – Liberate Ali Ibn Muhammad
Mission List (Tap to jump down the page!) |
||
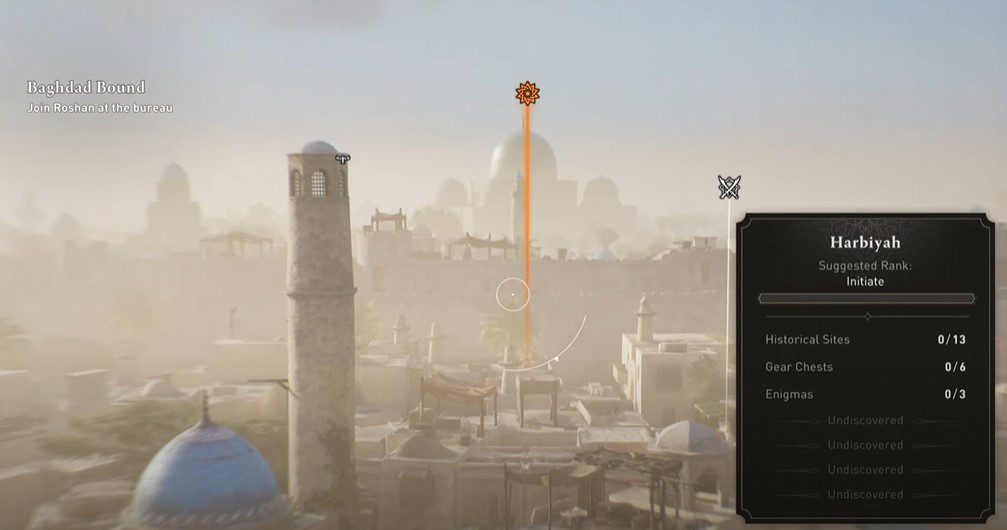
Baghdad Bound |
||
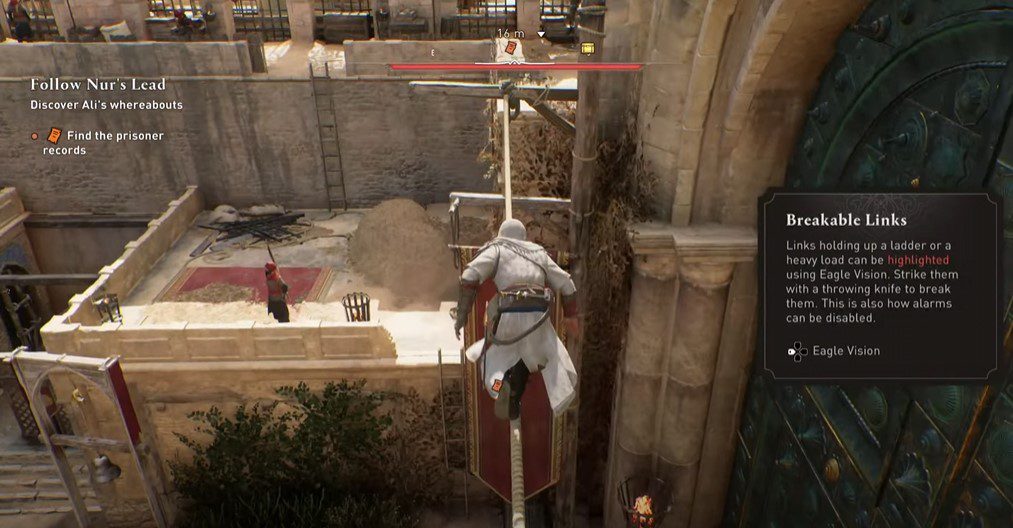
Follow Nur’s Lead |
||
Contact the rebels |
||
Zeroing In |
||
Jailbreak |
||
Find Ali |
Baghdad Bound
After another montage, we’ll now be in charge of Basim on the outskirts of Baghdad. You can call your mount at any time by holding the right directional button, but for now, hop aboard your mount and make the long trek along to Baghdad. There’s about 600 meters in totak, so feel free to explore the surrounding areas should you wish.

If you keep going to the city, proceed under the city gates and you’ll be in the midst of Haribyah.
Locate the Bureau
Our first port of call is finding the Bureau. Once inside the city, you’ll find a whole bunch of interesting locales, including flashing golden chests, collectibles and, of course, our main mission marker.
If you get lost at any time, you can call on Enkidu by pressing the up directional button, and he’ll help scout the area.
If you do this once you reach the larger square (next to the NPC with a map marker above his head), and face south, you’ll find the Bureau relatively quickly.
With our objective located, head on over, being sure to stay on the rooftops as you do. For the purposes of this guide, we won’t be going over all the individual chests unless they’re on the way to our destination or directly tied to our objective.
Join Roshan at the bureau
Having said that, the tall tower right in front of us (next to the blue-domed building pictured above) holds a synchronize point at the top and a golden chest halfway which holds 2x Components (for upgrading) along with 1x Hare Foot and 1x Peacock Feather.

Since this is on the way, we might as well do both of these!

Leap of faith down from the top, proceed forward and you’ll find the familiar sigil on the rooftop for our destination. Slip down from the roof and interact with the door.
Roshan and Fuladh will be inside and a brief cutscene will pave way for the next mission.
This bit of dialogue will pave way for a brand new case being opened up to us. This basically serves the same as the investigations menu from the original Assassin’s Creed game and will give us a number of branching paths that eventually converge together. The goal here is to find and Liberate Ali, and in order to do that, we must follow the clues.
Follow Nur’s Lead
The main clue here is to follow Nur’s contact. All we know is that they should be found in Shari’s Factory District. In order to learn more, go and speak to Roshan. She’ll mention a merchant that Nur had made contact with.
Roshan’s information is useful, as it’ll essentially help us hone in on the exact location of Nur’s contact. They’re at the dyeing factory to the north. When you reach the blue-domed building from before, use your Eagle Vision to scout the local area and you’ll find her.

Stick to the rooftops as you approach the Dyeing Factory to avoid the attention of the guards. As you get nearer however, another sub-mission will pop up labelled Contact the rebels. Ignore this one for now as we’ll be circling back to this shortly!

Head down and circle around to the doorway. Press Triangle to open and Basim will be shocked to see Dervis alive and well. He’ll explain that he’s the rebel merchant working with Nur. He also reveals that Ali hasn’t been killed, but he has been captured. Last they heard, he’s being kept in the Khurasan Gate Guardhouse, but that was weeks ago.
After speaking to Dervis, follow the marker all the way to the other side of town to the outpost Ali was allegedly taken to.
If you approach the Guardhouse from the south, you’ll have a much easier time of infiltrating. Skip up to the rooftop and once at the top, you can easily scout the area for the best place to complete your task.

Stay crouched on the roof and sneak along the edge until you find the perfect spot to do a dive down and hide in the haystack below.

Once there, press R3 to eavesdrop on the guards. After they’re done talking, Assassinate the guard closest and head up to higher ground. There’s a rope that passes right in front of the large gates helping us get closer to the prisoner records.
On the other side, jump down and assassinate the guard from above. Head down the ladder and quickly crouch into the grass. Assassinate the armed guard from the bushes, but be careful of the other guards lurking in the area.
There’s one such guard sitting in front of the doorway (just to the left of the bell in the picture above) and he happens to have a key to open the front door.
A good idea is to stand in front of the door and whistle to lure the guard closer. When he does, you can take him out with a sneak attack. Either way, grab 1x Scribe’s Key and unlock the door.
Inside, you’ll find a whole bunch of different trinkets, including 2x Hare Foot and 1x Bone Dice. You’ll also find Prisoner Records on the table.
Contact the rebels
With these two leads in the bag, it’s now find to find Beshi. Beshi is located to the north west of town and in the Upper Harbor area, nearby to the Dyeing Factory. Remember to use your Eagle to pinpoint the exact location, which again is close to the north west.

Go and speak to Beshi. He’ll explain he intends to get Ali back but in order to do so, he needs to get half his men back from the harbor who are being kept captive. Basim suggests going it alone and sneaking in… but that’s easier said than done.

There are guards located all over the place, but a good angle to attack from, is actually just to the left of the main path into the harbor (pictured below). You’ll find a guard standing watch on the roof in front and a man we can pay off to sing and distract the guards.
Move past him to the left and wait for the rooftop guard to turn his back to us. When he does, hop over the wooden beams and dive down into the cart on the other side (pictured below)


Wait for both guards to turn away from the cart in front and take a right, up the stairwell and up onto the roof. Assassinate the guard keeping watch up here and you’ll notice an armoured guard lurking about who happens to have the key we need.
Thankfully, his path pauses next to an explosive vase so if you have some throwing knives handy, throw one down and it’ll dispatch two guards at once.

Wait for the guards to stop investigating the area by hopping up to the rooftop and laying low. Alternatively, you can dispatch each of the guards one by one; it’s your choice.
Collect up the key and return to the building we assassinated the guard on the rooftop from. The floor below (under the collapsible scaffolding) can be opened with the key.
Head inside, free the prisoner and you’ll find a letter on the table labelled New Orders. There’s also a chest in here holding 26x Leather, 9x Steel Ingot and 3x Components. There’s also 3x Dirham and 1x Flamingo Feather up on the second floor. There’s also a door here we can unbar.
Head outside and turn right. Head into the doorway where we blew up the two guards and open the chest to the right. Grab 30x Leather, 10x Steel Ingot and 4x Components. There’s also a pot just to the left here where we can eat and replenish our health.
The guards are located just round the corner and there’s a fair few of them guarding the rebels, who are located at different areas.
There’s one onboard the pirate ship, which you can reach after freeing the other on the dock.

Sneak round and use your Throwing Knives to knock down the crane and kill two guards instantly. The solitary guard next to the rebel can actually be taken out from above just after if you’re quick. Be careful though as there is another soldier just above this patrolling the area. Be sure to use your Eagle Vision to hone in on where the prisoners are being kept.

For the one on the boat (pictured above) approach from the two canoes and hang on the net. Wait for the guard furtheest from our location to turn away and assassinate the soldier leaning against the boat. Hop up and assassinate te other to free the final rebel.
At the back of the boat, you’ll find a chest hidden behind a bunch of movable shelves, holding 1x Zanji Uprising Outfit.
Return to Beshi, who you’ll now find further east on the edge of the dock.

For your good work, he’ll hand over a Khidmah Token. These can be spent for favors from factions in Baghdad. You can earn more over time by completing Contracts, opening chests or even by pickpocketing people in the streets.
Zeroing In
With all three leads now followed, it’s time to head back to the Bureau. Just like before, approach from the rooftop and drop back down for an update from Roshan and Fuladh. They’ll reveal that they discovered Ali was brokering a deal with Nur to supply the rebels with resources in exchange for his help.
In exchange for this information, Basim will explain that Ali may well have been sent to Damascus Gate Prison. Only, it’s the most well-guarded prison in the city, so it’s not going to be easy to break in.
Thankfully, Abu behind the counter will show that he can improve various gear using resources collected through the world and, mainly, through chests.
There’s also a new board in the hideout too, including various contracts we can complete, giving us extra resources and favour with certain factions.
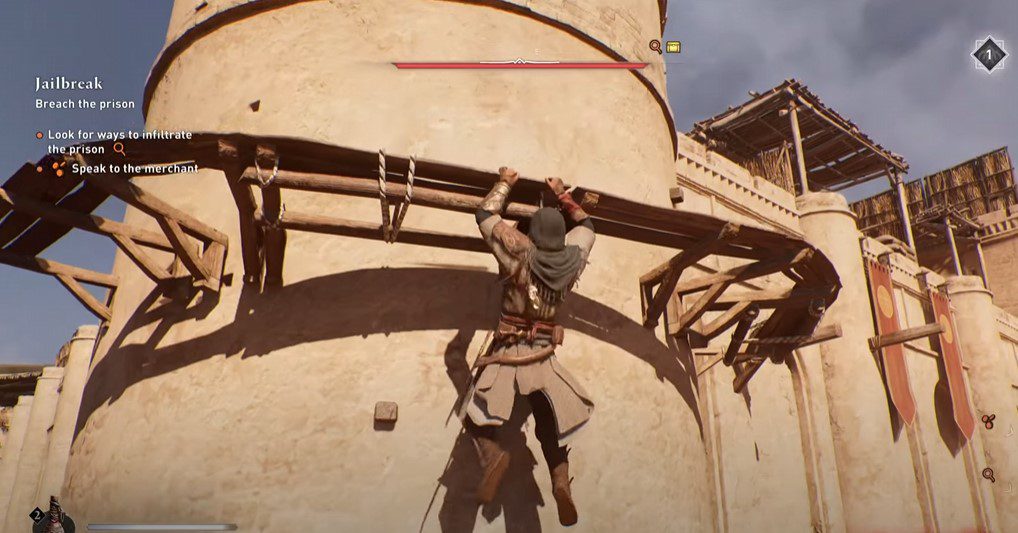
Jailbreak
Exit the hideout and proceed along the pathway toward Fuladh’s location, up on the rooftops. Before you do, Basim will mention a blacksmith, which is located just north of the bureau’s location. They actually sell sword upgrades which can be useful, depending on how you approach this mission. It’s not essential, but if you intend to be a little less stealthy, it can be very useful.

When you’re ready, head up to Fuladh’s location and scout the area. Fuladh will leave but your infiltration options will rest entirely with whichever you see fit to pursue.

Fuladh mentioned two options here, which include paying the merchant or paying the rebels. Should you choose the latter, this will be a much more combat-focused approach (hence the earlier blacksmith upgrades). However, if you want to stick to stealth, pay the merchant.
Pay The Merchant
The Merchant can be found on the east side of the prison. Do a Leap of Faith down from your starting position and head to the left. There, you’ll find the sketchy guy with a magnifying glass above his head.

He’ll require a Merchant Favor Token, which can be earned by helping those around Baghdad or pickpocketing the right citizen. This can be sped up by using your Eagle to scout busy areas, honing in on those with gold purses. You can also complete contracts that offer Merchant Favor Tokens as a reward.
Should you hand over the token, he’ll lead you through the front gates, past the guards watching and into a storeroom, where he’ll leave you.
Go up the stairs through the exit to the left and eventually you’ll reach a barred door you can unblock to access a whole bunch of cells. Watch out for the two guards; sneak past them, jhead to the end of the corridor and turn left.
Pay The Rebels
Should you choose to Pay The Rebels, you’ll need 1x Power Favour Token which can be obtained in the same way from the tips above; complete the appropriate contract or pickpocket the right person.
The rebel leader is located to the east side of the prison (proceed round to the right from the haybale cart). After paying him, the rebels will lead you to a side entrance. While the rebels fight, head round the skirmish and through the door, following the path until you reach a room where a guard is standing by some shelves.
Kill the guard and head up the stairs to the right. Kill the next guard and then unbar the door. Head out into the small alleyway, sneak past the corridor to your left and then both paths will converge.
Go Up To The Roof
There is a third option here and it doesn’t involve using either of these tactics. If you scout round the south side of the prison, you can find a route up to the rooftop via the south tower.
If you take out the guards on the ground and head up from here, you’ll be able to reach the prison a lot quicker, but with many more deaths too, which will inevitably raise your notoriety meter.
Find Ali
Regardless of which path you took to get here, you’ll eventually find yourself amongst the prisoners in the yard. To the south east, you’ll find an open doorway. Head inside and stay crouched down. Watch out for any guards that may be lurking here.
You’ll also find a crate in here that will replenish your throwing knives, and another holding 1x Peacock Feather.

There are two guards with their backs turned so you can either take them out with throwing knives or lure them away from the door with some well-placed whistling.
Once they’re down, head to the right first and up the stairs. Take out the two guards patrolling the area and you’ll find a chest full of gear partway.
Return to the branching path and this time head to the left. Be sure to use your senses here as there are a lot of guards. The AI in this game is, predictably, woeful. It’s quite easy to sneak up on the guards from behind, given the number of tarps blocking the view.

You’ll find a civilian on the far side and he’ll explain that “death will come for him soon”. Basim assumes this is about Ali so it’s time to get a move on.
From the Civilian’s position, climb up the shelf to the left and wait for the opportune time to strike the guards in the next room. The guards are located on either side of this balcony. Head to the right first, as there’s only one on this side, and then circle around to take the two out on the other side.

Jump down to the floor below and unbar the lock on the door to the far right. Once inside, take out the guard sitting on the floor and proceed down into the next doorway to the right (pictured below).

Down in the dungeons, colelct up 1x Dirham on the way and follow the raised voices to where the Jailer is taunting Ali. Stay crouched and sneak up from behind. He should vbe facing away from you and you’ll be able to take him out with a swift knife blow.
Find the guards’ quarters
Ali isn’t ready to leave yet, given he wants to infiltrate the Guards’ quarters. You’ll also come into possession of 1x Damascus Prison Keys.
Unlock the doors heading out the basement, and the next leading north. Return to the area we took out the three guards before and unlock the marked door (pictured below).

With the door unlocked, Ali will catch up and the pair of you will have to fight your way through a few guards. As you reach the next door, a short cutscene will ensue.
Escape the prison
When you regain control of Basim again, all hell will have broken loose. From the rooftop proceed to the south, where you’ll find a relatively safe route down and out of the area.
When you become anonymous, chances are your notoriety will be too high to continue the game’s narrative just yet. Your best bet is to remove wanted posters or bribe Munadi to decrease this down. The latter is the fastest option and you’ll find one located in the town square.
<< Taking Flight |
Assassinate Al-Ghul >> |
You can check out our full walkthrough and game guide here! |
|